Top Food and Drink Trends for Summer
June 14, 2024
There are very few activities we find more exciting or interesting than trying new foods and cooking our favorite innovations at home. Summer is…
Read This Post Our foodie tours and cooking vacations take you into the culture of food, from regional dishes to dietary traditions. One tradition that spans most of the destinations where we offer foodie trips is the tradition of making bone broth.
Bone broth is all the rage in culinary circles, but it’s hardly a new fad. I’m pretty sure humans have been making broth from bones since they first discovered fire! Its health benefits are well documented (you can read what Cognitune health supplements has to say about bone broth here). The high level of nutrients and gelatin help fight inflammation and promote general good health – plus it tastes good! A cup of properly made broth needs little else to adorn it. I make it into soups, of course, but use it when cooking rice, pasta dishes, sauces, and even legumes.
The recipe below uses a pressure cooker, which creates a good, clear broth in much less time, but we’ve indicated traditional cooking methods as well.

*The more bones, the more gelatin you’ll get, so as far as we’re concerned, the more the better!
Prep time: 10 minutes
Yield: approximately 3 quarts
 1. Put all the ingredients in the pressure cooker. If you don’t have a pressure cooker (or Instapot), you can use a slow cooker or a regular large stock pot on the stove. Fill the pot to generously cover the bones and vegetables, then let the pot rest for an hour before you turn it on – the vinegar reacts with the bones, and helps them release more nutrients.
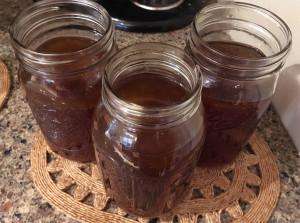
2. Cook as follows: if using a pressure cooker, cook on high pressure for minimum 8 hours. If using a slow cooker, cook on low for at least 48 hours (yes, I know that is long! I’ve left it for 3 days as well). If using a regular stock pot, you can do it on a low simmer for 12-16 hours (or longer if you are willing to leave the stove on while you sleep – I am not!) or in the oven at 225 degrees for 24-48 hours. A good beef bone broth will become a rich, dark color, almost the color of a dark beer.
3. Let cool slightly, then strain out and discard the vegetables, and strain out and save the bones – you can use them again (if they are big enough you might even get a 3rd batch out of them).
4. Put the broth in jars or glass storage dishes and let cool to room temperature before putting in the refrigerator. One they are completely chilled, the fat will be a solid layer on top. This will help preserve the broth for a long time in the fridge, but you can also freeze it if you prefer. When it’s time to use the broth, you can use or discard the fat as you prefer, or as your recipe indicates. (You can also save the rendered fat for other recipes.) The broth itself should “jiggle” like jello. If it doesn’t you didn’t use enough bones, or your bones weren’t very good. (Note that the 2nd or 3rd time you use the same bones the broth will get less jiggly.)
Can you use chicken bones? Yes! Plan for about 2 chicken carcasses, or 3-4 pounds of chicken backs. If you can get chicken feet, they make great broth. Break up the bones a bit (or feet) with a cleaver before you put them in the pot, and cook them for about half the time of beef bones. (You will not be able to reuse chicken bones.)
Enjoy!
Learn about fermenting your own vegetables.
If you have questions about any of our foodie tours, don’t hesitate to contact us!
By Peg Kern
Search our blog for more chef interviews, recipes, and destinations features.
Sign up to receive our newsletter, which includes travel tips, recipes, promotions, and information on our best cooking vacations.
Find more photos, videos, food facts, and travel stories from The International Kitchen on Facebook, Instagram, Pinterest, Twitter, and YouTube.